Glass machining presents unique challenges that traditional methods struggle to overcome. The material is brittle, prone to cracking, and demands extreme precision. Manual processes often result in inconsistent edges, chipping, and high waste rates.
You face pressure to deliver flawless components while managing tight tolerances. These difficulties have pushed manufacturers to seek better solutions. CNC glass machining addresses these problems through automated precision control. Computer-controlled tools cut, drill, and shape glass with great accuracy.
You get the same results every time, unlike when you do things by hand. CNC systems are now used every day in fields ranging from electronics to construction. This method cuts down on waste, speeds up production, and meets the high standards of modern applications.
What is Glass Machining?
Glass machining is the process of shaping glass into precise parts and components. However, machining glass is very different from machining metals or plastics. Glass is a brittle material, which means it can crack or break easily if it is not handled correctly.
Unlike metals that can bend or deform during machining, glass fractures when excessive force or stress is applied. For this reason, the goal is not simply to cut the material but to remove it in a controlled manner while preventing unwanted cracks and damage.
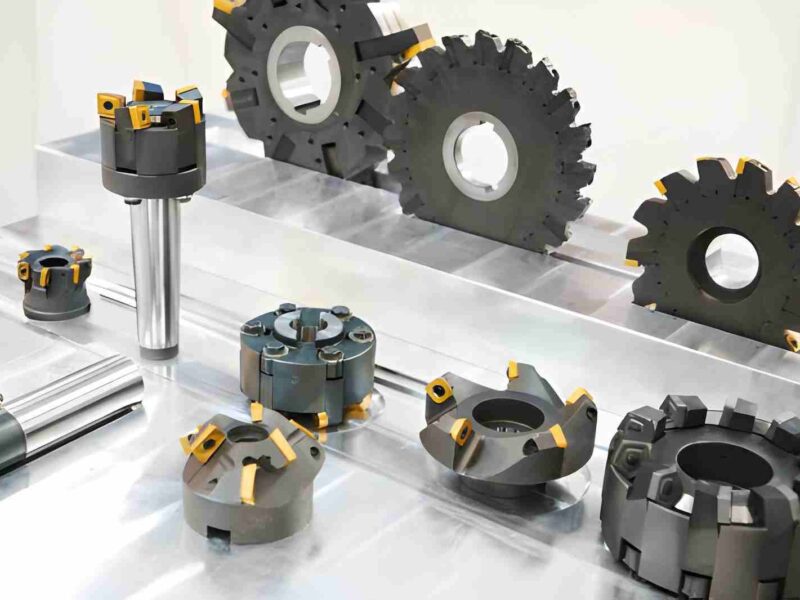
Tool selection plays a critical role in the process. Diamond-coated tools are commonly used because glass is highly abrasive and requires extremely hard cutting surfaces. These tools gradually grind away the material while maintaining dimensional accuracy and surface quality.
Heat generation is another major challenge in glass machining. Friction between the tool and the workpiece creates heat, which can introduce internal stresses within the glass. If these stresses become too high, microcracks may develop. In many cases, these cracks are not immediately visible but can cause the component to fail later during use.
To prevent damage, manufacturers carefully control machining parameters such as cutting speed, feed rate, and cooling conditions. Maintaining the proper balance between material removal rate and stress control is essential for producing high-quality glass components with reliable performance.
Glass Machining Process: Start to Finish
Material Selection and Preparation
Pick the right type of glass for your project first. Soda-lime glass is easier to work with and costs less. Borosilicate cuts more slowly but handles thermal stress better.
After being heated, tempered glass can’t be machined at all. If you need to cut or drill it, choose annealed glass. Look at each sheet in the right light before you start. If you hold it at an angle, you can see scratches on the surface or bubbles inside.
Gently press on the surface to see if there are any cracks. Any flaw will get worse during machining and ruin the piece. Don’t accept bad materials right away.
Use isopropyl alcohol and microfiber cloths to clean the glass. Get rid of all fingerprints, dust, and oil stains completely. Even one speck of dust can chip the edge while cutting. Before mounting, give the surface two minutes to dry. Cleaning glass machines regularly improves edge quality.
Workpiece Fixturing and Setup
For best results, put the glass on a Hoover table. The suction keeps it flat without making any pressure points. For a secure hold, use a mercury hoover of 15 to 20 inches.
Make sure that the whole surface touches the table evenly. Air leaks will make the glass move around while you are cutting it. Carefully use the machine’s coordinate system to put the glass in the right place. To find your zero point, measure from two edges that are at right angles to each other.
Most CNC systems need the X, Y, and Z coordinates to be set very carefully. If you make a mistake of even 0.5mm, your whole cut pattern will be wrong. To measure the height of the Z-axis, use a dial indicator.
Tool Selection and Configuration
Use diamond core drills to drill holes in glass. The size of the hole you need should be the same as the size of the drill. Use diamonds with a grit of 100 to 120 to quickly remove material.
Use 200 – 400 grit to make the walls of the holes smoother. Finer grits cut more slowly but leave a better finish on the surface. Choose grinding wheels based on the shape of the edge you need. Flat wheels make straight edges.
Cup wheels can fit into tight spaces and corners. With profile wheels, you can make bevels in one pass. It’s important to always check that the wheel’s RPM rating is higher than the spindle speed.
Try to keep the extension under 50 mm. Follow the manufacturer’s torque specs when tightening collets. Tools that are loose, vibrate, and make surfaces look bad.
Setting up the CNC System
Put your CAD design into the software that controls it. Using the right settings in the post-processor, turn it into toolpaths. For most glass drilling, the spindle speed should be between 2000 and 4000 RPM. Depending on how thick the glass is, set the feed rate to 50 to 150 mm per minute. To keep thicker glass from breaking, you need to feed it more slowly.
All cutting operations should include a lead-in and lead-out path of approximately 2–3 mm. This approach prevents the cutting tool from engaging the glass abruptly, reducing the risk of edge chipping and surface damage.
During entry, the tool should gradually approach the material at an angle of 5 – 10 degrees rather than plunging directly into the glass. A similar exit path should be used when leaving the cut. These controlled entry and exit techniques help distribute cutting forces more evenly and minimize stress concentrations around the edges.
By reducing localized stress during machining, manufacturers can improve edge quality, lower the risk of cracking, and achieve more consistent results throughout the process.
It’s safer to make several shallow passes than one deep cut. To get better edge quality, add a 0.1mm finishing pass at the end. Include 1 to 2 seconds of dwell time at the bottom of the holes. This gets rid of debris and lowers the amount of heat that builds up.
Executing the Machining Operations
Turn on coolant flow at 2-3 litres per minute. Water-based coolants work best for most glass types. Aim the nozzle directly at the cutting zone. The stream should flood the area, not just mist it. Insufficient coolant causes thermal cracking within seconds.
Start the spindle and let it reach full speed first. Approach the glass at the programmed feed rate without hesitation. Listen for a steady grinding sound throughout the cut. High-pitched squealing means too much pressure or insufficient coolant. Stop immediately if you hear cracking sounds.
Watch the swarf colour as material removes. White or clear particles indicate proper cutting. Brown or black debris means overheating. Adjust feed rate or coolant flow if needed. Complete each operation without pausing mid-cut when possible.
Edge Treatment and Finishing
First, use 120-grit diamond wheels to grind all of the cut edges. This gets rid of saw marks and tiny cracks that happen when you cut. Move the wheel along the edge at a speed of 100 to 200 mm per minute. Throughout the pass, put light, steady pressure on it. When you put a lot of pressure on the edge, it chips instead of smoothing.
Move on to 220-grit wheels for more smoothing. Then use 400-grit to polish the edges. Each grit level gets rid of the scratches from the step before it. At each grit level, spend 30 to 60 seconds on each linear meter. You should be able to touch the edge, and it should feel completely smooth.
All outside corners should have a 0.5-1mm chamfer. This little break keeps sharp edges from being dangerous. At 3000 RPM, use a 45-degree chamfer bit. To keep things consistent, make one long pass along each edge. Chamfered edges don’t chip as easily when you handle or install them.
Quality Inspection and Verification
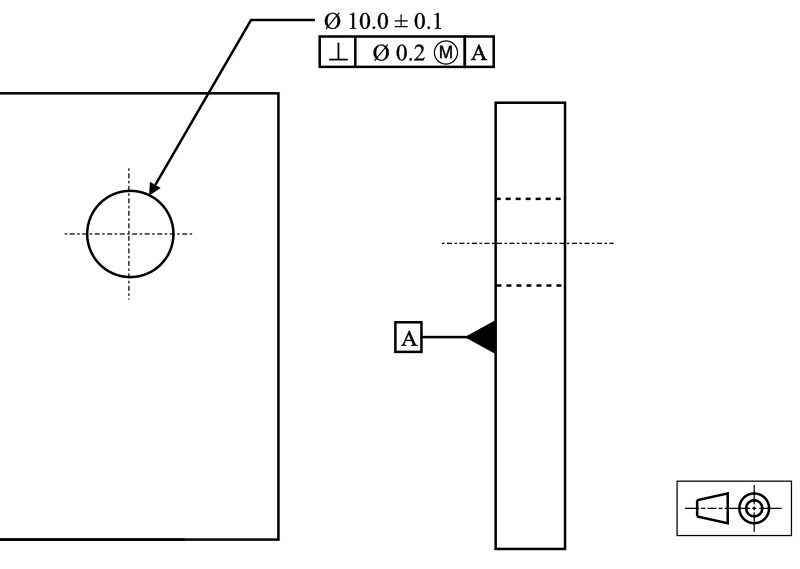
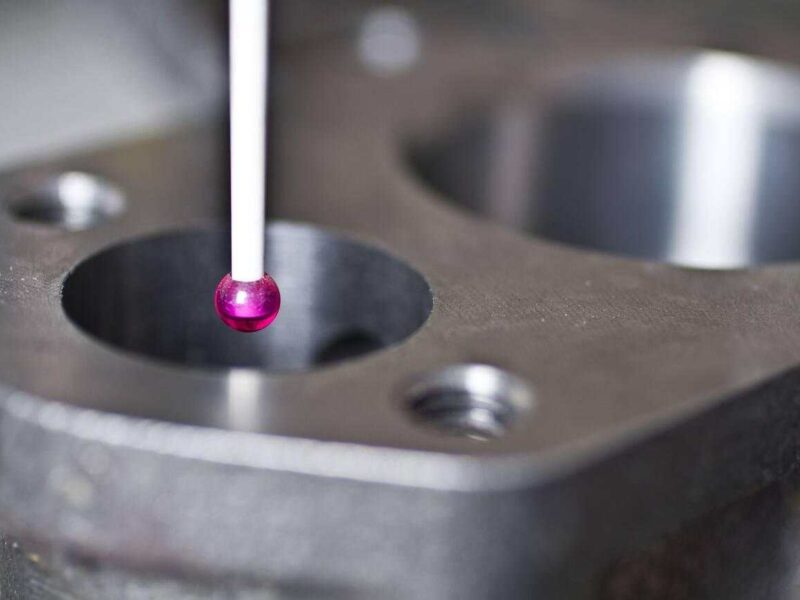
Measure hole diameters with pin gauges or digital callipers. Check that dimensions fall within ±0.1mm of specification. Verify hole positions using coordinate measuring equipment. Measure from two reference edges for accuracy. Document any deviations from design tolerances.
Examine all edges under 10x magnification. Look for microchips smaller than 0.5mm. Check for shell-shaped fractures along the edge face. Inspect the backside where the breakthrough occurred. Any visible cracks indicate process problems that need correction.
What are the Techniques Used in Glass CNC Machining?
Glass CNC machining uses several distinct methods to shape components. Each technique handles specific operations based on your requirements. Understanding these methods helps you select the right process. Here are the primary techniques used in modern glass machining.
Grinding Work
Grinding is done by wheels with diamonds in them that spin very quickly. The abrasive particles break the glass surface in a controlled way. This method gives you flat surfaces, edges, and shapes.
The grit on the wheel affects how fast it removes material and how smooth the surface is. Coarse grits (60-120) take off stock quickly, but they leave rough surfaces. Fine grits (220–600) make smooth, shiny finishes. Most jobs need to be done several times with grits that get finer each time.
Surface grinding consistently gets flatness tolerances of less than 0.01mm. Edge grinding gets rid of tiny cracks and makes the edge of the glass stronger. This method is necessary for structural uses that need strength.
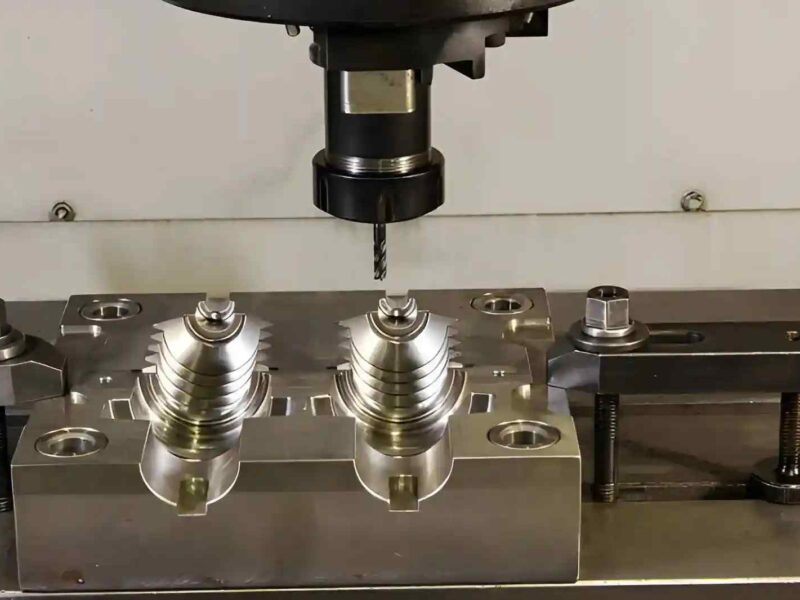
CNC Drilling
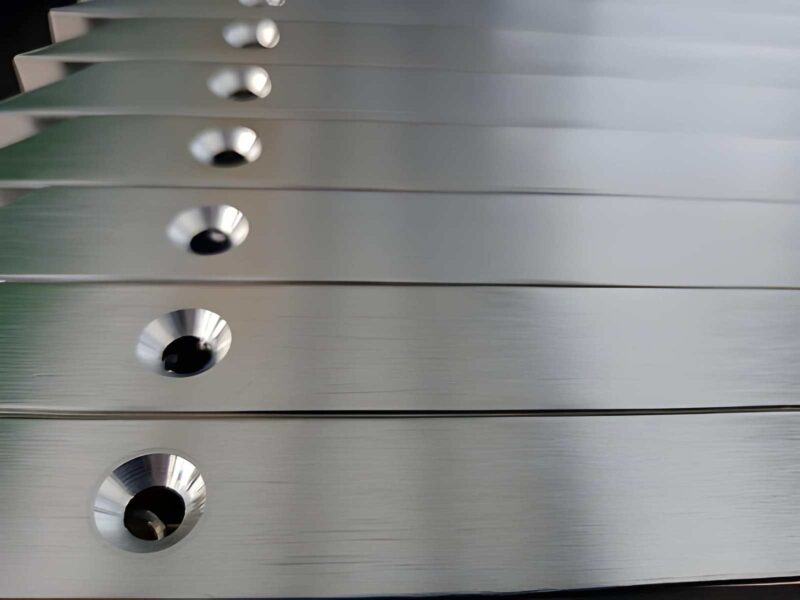
Glass drilling is commonly performed using diamond core drill bits operating at speeds between 2,000 and 5,000 RPM. Unlike conventional drill bits, these hollow tools remove a cylindrical core from the material rather than cutting through the entire hole area. Coolant is supplied through the center of the drill to remove debris, reduce heat buildup, and minimize the risk of cracking.
Feed rates typically range from 50 to 200 mm per minute, depending on the glass type, thickness, and hole diameter. The process can be used to create both through-holes, which pass completely through the material, and blind holes, which stop at a specified depth. Additional operations, such as countersinking, can also be performed to create recessed areas for fastener heads or assembly components.
Modern CNC glass drilling systems offer high levels of precision, with positioning accuracies often reaching ±0.05 mm. These machines can drill multiple holes in a single setup without repositioning the workpiece, ensuring accurate center-to-center spacing and consistent dimensional quality across the finished part.
CNC Milling
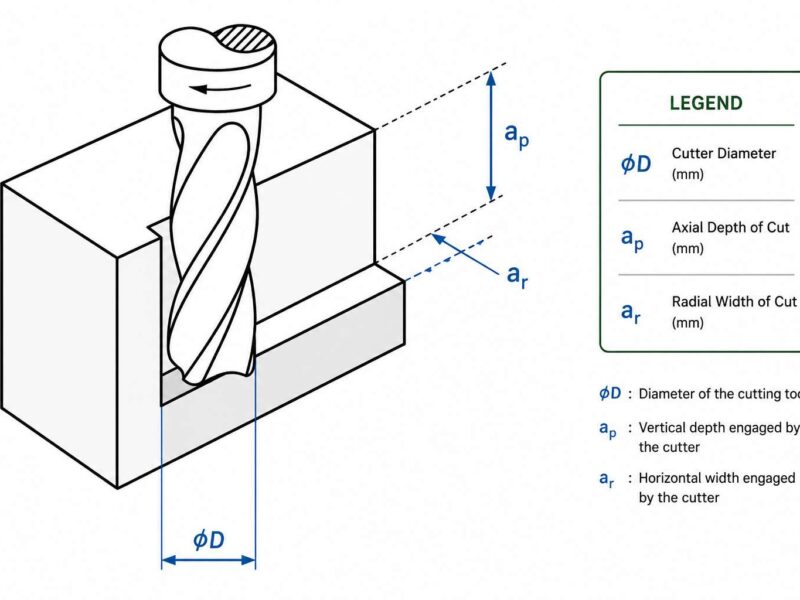
Milling uses rotating diamond end mills to make three-dimensional shapes. The tool can move in all three directions at once: X, Y, and Z. This makes glass have holes, pockets, and sculpted surfaces.
The cut should not go deeper than 0.5 mm per pass. The distance between steps is usually 10 to 20 per cent of the tool’s diameter. Compared to regular milling, climb milling cuts down on edge chipping.
For optical applications, ball-end mills make smooth, curved surfaces. Flat end mills make square corners and pockets with flat bottoms. Tool paths need to keep stress concentrations at feature boundaries to a minimum.
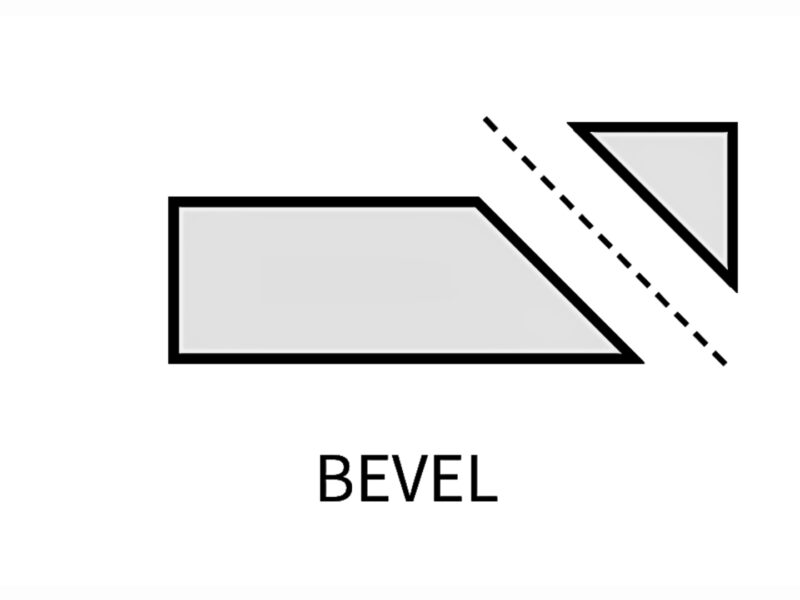
Edge Profiling
Edge profiling gives the edges of glass specific geometric shapes. Profiled diamond wheels fit the edge contour perfectly. The wheel stays in touch with the edge as it moves.
Some common shapes are pencil edge, bevelled edge, and bullnose. Bevel angles are usually between 30 and 45 degrees from the vertical. The width of the profile can be anywhere from 10 to 25 mm, depending on the design needs.
The final polished profile is achieved through several grinding stages. The wheels get finer and finer as you go through each stage. The edge is smooth and finished, so no more work is needed.
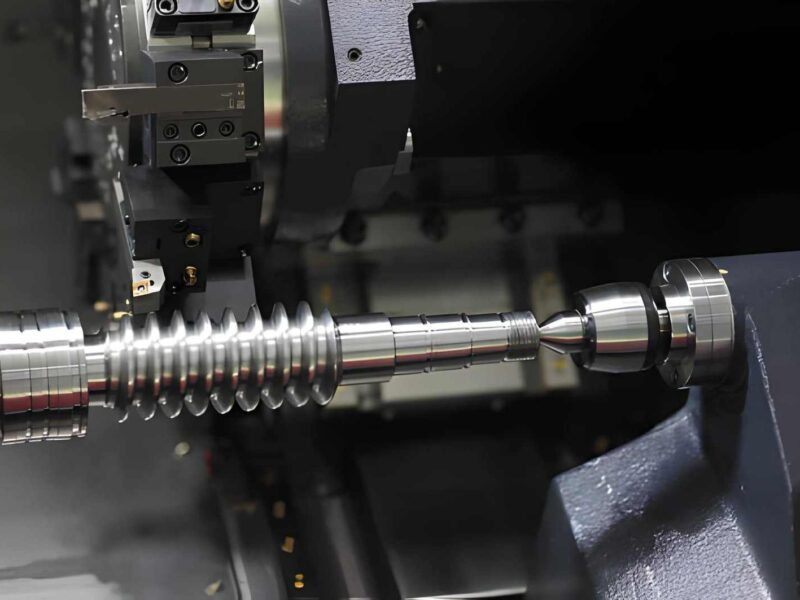
Turning Operations
Using CNC lathes to turn glass parts into cylinders. The diamond tool moves along the length of the workpiece while it turns. This makes tubes, rods, and spheres that are round.
Most glass turning requires spindle speeds between 200 and 800 RPM. The cut should not be deeper than 0.3 mm each time. To keep the workpiece from bending, feed rates of 20 to 80 mm per minute are needed.
Tailstock support stops long, thin parts from vibrating. For dimensional accuracy, radial runout must stay below 0.02mm. Cylindrical grinding comes after turning to make the surface smoother.
Sawing and Cut-Off
Diamond-impregnated blades are used to cut glass sheets apart. The thickness of the blade can be anywhere from 0.5 to 3 mm, depending on what you need it for. Thinner blades make narrower kerfs, which cuts down on material waste.
Most sawing jobs work well with feed rates of 100 to 300 mm per minute. Cuts all the way through separate pieces, while cuts only partway through make grooves. Plunge cutting sends the blade straight down through the material.
Flooding the coolant constantly keeps the blade from glazing and getting too hot. For straight, accurate cuts, the tension on the blade needs to be changed regularly. Change the blades when the cuts get worse or the chips get bigger.
What Glass Types are Suitable for CNC Machining?
Different types of glass need to be machined in different ways. Every composition has its own properties that affect how easy it is to machine. Knowing about these differences will help you choose the right material. Choosing the right thing keeps you from making expensive mistakes and makes production more efficient.
Soda-Lime Glass
The most common type of glass used around the world is soda-lime glass. It has about 70% silica, 15% soda, and 10% lime in it. This material is easy to work with and costs less than speciality glasses. You can find it in windows, bottles, and most things you use every day.
This type of glass can be cut and drilled using standard CNC settings. A feed rate of about 100 to 200 mm per minute works well in most cases. The best results are usually achieved with spindle speeds between 2500 and 4000 RPM. Diamond tools are suitable for machining this material.
Soda-lime glass provides decent edge quality, but it is not the highest-grade option. It is more prone to micro-chipping compared to premium glass types. However, the surface finish is acceptable for most applications. It can handle some thermal changes, but cooling must remain consistent and controlled.
Borosilicate Glass
Borosilicate glass is mainly made of 70–80% silica and 7–13% boron trioxide. This composition helps it resist thermal shock much better. It can handle sudden temperature changes that would normally crack soda-lime glass. Because of this, borosilicate is commonly used in laboratory equipment and cookware.
It takes longer to feed borosilicate glass than soda-lime glass.
To reduce chipping, lower the feed rate by about 20–30%. This material is harder and more brittle during cutting, so it needs careful handling. Compared to softer glass types, diamond tools also wear out more quickly.
With the correct settings, machining produces very good edge quality. The material can maintain tight tolerances in repeated production runs. Drilling also creates clean holes with minimal damage around the edges. Borosilicate is ideal for applications that require strong thermal stability.
Fused Silica Glass
Silica that has been fused is 99.9% pure silicon dioxide. This ultra-pure mix gives it amazing thermal and optical properties. The material lets UV light through and can handle very high and low temperatures. Fused silica is very important to the semiconductor and optical industries.
It is much harder to machine fused silica than other types. Typically, feed rates need to drop to between 30 and 50 mm per minute. For stability, spindle speeds stay between 1500 and 2500 RPM. This hard material uses a lot more diamond tools than usual.
With the right grinding sequences, surface finishes can be made to look good. The material has very tight tolerances of less than 0.01 mm. It doesn’t expand much when it gets hot, which makes it perfect for precise uses. The price is much higher than that of regular glass types.
Tempered Glass
Soda-lime or borosilicate glass that has been heated is called tempered glass. The process of tempering puts pressure on the surface and tension on the core. This treatment makes things four to five times stronger. Safety applications need tempered glass because of how it breaks.
Before tempering can happen, CNC machining must happen. Cutting or drilling tempered glass makes it shatter right away. The internal stress can’t handle operations that remove material. Before heat treatment, all holes, cuts, and edge work must be done.
Design considerations must take into account the limits of the tempering process. After tempering is done, the holes can’t move. Once heat treatment is done, edge profiles stay the same. Before sending for tempering, plan all of the machining work carefully.
Laminated Glass
Laminated glass is made of two layers of glass bonded together with a plastic interlayer. The most commonly used interlayer material is polyvinyl butyral (PVB). This design stops the glass from completely breaking when it cracks. Laminated glass is used in car windscreens and security windows.
When machining laminated glass, you need to think about the interlayer in a different way. Standard diamond tools work well to cut through layers of glass. The plastic interlayer makes tools dull faster than just glass. During production, you need to change tools more often.
Edge finishing has to keep moisture from getting into the interlayer. PVB that is not protected absorbs water and causes delamination over time. After machining is done, special edge sealants are used. Around the interlayer perimeter, through-holes need the same kind of sealing.
Aluminosilicate Glass
Aluminosilicate glass contains alumina, which improves its chemical and mechanical strength. This makes it more resistant to scratches than soda-lime glass. Its strength is close to that of chemically strengthened glass. It is commonly used in touchscreen displays and protective device covers.
The machining settings are between soda-lime and borosilicate glass. It works well when the feed rate is between 80 and 150 mm per minute. Spindle speeds of 3000 to 3500 RPM are a good balance between speed and quality. With the right use of coolant, diamond tools last a long time.
After machining, the edge strength is much higher than that of standard soda-lime glass. The material can handle impact and bending stress better. Surface hardness means that it will scratch less when you handle and process it. The price is higher, but that’s okay for demanding uses.
Lead Crystal Glass
Lead crystal is made up of 18% to 40% lead oxide. This gives it a high refractive index and a lot of brightness. Compared to regular glass, this material is softer and easier to work with. Lead crystal is used in fine glassware and decorative items.
Lead crystal CNC machining goes faster than regular glass. The softer material lets feed rates go up by 30% to 50%. Less wear on tools happens when the hardness is lower. Edge polishing makes things very clear and smooth.
Limitations to Glass CNC Machining
CNC machining for glass is very precise, but it also has some limitations. Brittle materials are harder to machine compared to metals, so special care is needed. Understanding these limits helps prevent design and production errors. Below are the main challenges you may encounter.
Risk of Material Brittleness and Fracture
Glass doesn’t bend; it breaks instead. A single crack spreads through the whole piece right away. Stress builds up at sharp corners, which makes it easy for fractures to start. Glass doesn’t bend like metal does.
For safe machining, the minimum wall thickness must be more than 3mm. Cutting forces cause thinner sections to break. Feature spacing needs enough space between cuts. Holes that are too close together make the structure much weaker.
Impact during machining causes things to break right away. Loose fixtures cause vibrations that break things. Flaws in the material become points of failure. The scrap rates are higher than the metal machining rates.
Thickness Limitations
It is very hard to safely machine glass that is less than 2mm thick. Just the pressure from the clamps can break thin sheets. Most CNC systems work best with materials that are 3 to 10 mm thick. You need special tools to work with very thin glass.
There are different problems with thick glass that is more than 25mm thick. Drilling takes a lot longer the thicker it gets. In deep cuts, getting rid of heat becomes a problem. The tool’s deflection gets worse as the length increases.
Complex Geometry Constraints
You can’t machine-sharpen inside corners. The smallest inside radius is half the diameter of the tool. Most corners need a radius of at least 2 to 3 mm. To make square corners, you need to cut wire.
Standard operations can’t do undercuts or reverse angles. Deep, narrow slots don’t work when the depth is more than three times the width. Small details that are less than 1mm break easily. Simplifying design raises the chances of success.
Tolerance and Surface Finish Restrictions
It’s hard to keep dimensional tolerances tighter than ±0.05mm. The final size is affected by how glass expands when it gets hot. Different types of materials cause the thickness to change. Specialised tools are needed for precision below 0.02mm.
On big panels, there are limits to how flat the surface can be. Expect differences of 0.1 to 0.3 mm per metre. Optical polish takes a long time to process. Finishes with mirrors cost a lot more.
Thermal Limitations During Processing
Localised thermal expansion happens when heat is generated. Stress and cracking happen when the temperature changes quickly. Glass doesn’t conduct heat very well. The coolant must always be flooding.
Operations that go too fast make too much heat. There are real upper limits to feed rates. Aggressive parameters cause thermal shock. When you use dull tools, they get hot right away.
Post-Machining Strength Reduction
Micro-fractures in machined edges make them weaker. Surface grinding can make things 30–50% less strong when they bend. Holes drilled into things create points of stress concentration. The strength loss around the holes is 40%.
Chemical strengthening after machining brings back the strength of the edge. Ion exchange treatments make things work better. These extra steps cost more. Fire-polished edges are still stronger than edges that have been machined.
Equipment and Tooling Requirements
CNC machines that are specialised cost a lot more than metal machines. Diamond tools are required and are expensive. The life of the tool is short, so it needs to be replaced often. A full set of tools costs thousands.
For fixturing, you need vacuum tables or soft-jaw clamps. Standard clamps break glass. Custom fixtures make setup more difficult. The first investment in equipment makes it hard to get started.
Production Speed and Economic Factors
Glass machines are much slower than machines that work with metals or plastics. Conservative settings keep things from breaking, but they also make the cycles take longer. A piece of aluminium that takes 10 minutes to make might take 45 minutes to make in glass. A lot of scrap slows down production.
Setup time increases due to the need for careful alignment. Before machining, each piece needs to be checked. The cost of labour is higher. The total cost per part is higher than that of other materials.
Is Glass CNC Machining Expensive?
Glass CNC machining costs more than machining metals or plastics. Multiple factors contribute to the higher price point. Understanding these costs helps you budget projects accurately. Here’s what drives the expense.
Equipment Investment Costs
It costs between £50,000 and £500,000 to buy a CNC machine for glass. Standard metal machines don’t have the right features for working with glass. Adding vibration-damping systems and special controls costs more. Without steady demand, most stores can’t justify this investment.
The price of hoover tables and fixturing systems ranges from £5,000 to £20,000. Adding custom fixtures for certain parts costs more money. You have to spend money on separate temperature-controlled coolant systems. The total cost of the equipment is two to three times higher than that of metal machining.
Costs for tools and supplies
A diamond tool costs between £50 and £500 each. You need between £3,000 and £10,000 for a basic tool set. Compared to metal cutting tools, tool life is short. You should expect to have to replace them every 20 to 50 hours of cutting time.
Grinding wheels wear down quickly and need to be dressed often. Coolant needs filters to get rid of glass particles. Abrasive costs add £5 to £20 per part, typically. These consumables significantly impact per-part pricing.
Labour and Skill Requirements
Skilled glass machinists command higher wages than general operators. Training takes 6-12 months to reach proficiency. Setup times run 2-3 times longer than metal parts. Active monitoring during operations increases labour hours.
Quality inspection requires specialised skills and equipment. Each piece needs careful examination for cracks. Rejection rates of 5-15% are common. Labour costs represent 40-60% of total machining expense.
Material Waste and Scrap Rates
Glass scrap rates run 10-20% on average production. Complex parts can see 30-40% scrap rates. Rejected material cannot be recycled like metal chips. Each scrapped piece loses all invested machining time.
Raw glass material costs £20 to £200 per square metre. Specialty glasses like fused silica cost significantly more. Minimum order quantities often exceed immediate needs. Material waste adds substantially to project costs.
Cycle Time Considerations
Glass machines are 3-5 times slower than aluminium parts. Conservative feeds and speeds prevent breakage. A simple part takes 30-60 minutes, typically. Complex geometries can require 2-4 hours per piece.
Multiple grinding passes extend cycle times further. Edge polishing adds 10-20 minutes per edge. Secondary operations like chamfering increase total time. Slow production limits cost efficiency on volume orders.
Typical Cost Breakdown
Simple flat cuts cost £20 to £50 per piece. Drilled holes add £5 to £15 each. Edge grinding costs £10 to £30 per linear metre. Complex 3D milling runs £100 to £300 per part.
Small batch orders (1-10 pieces) cost 50-100% more per part. Set-up costs are spread across fewer pieces. Volume orders (100+ pieces) reduce per-part costs by 30-50%. Prototype work commands premium pricing.
Comparison to Alternative Methods
Waterjet cutting costs 20-40% less than CNC machining. Laser cutting is 30-50% cheaper for simple shapes. Manual grinding costs less but lacks precision. CNC provides accuracy that justifies the premium.
Moulded glass parts cost less in high volumes. Tooling investment of £10,000 to £50,000 is required upfront. Break-even occurs at 1,000 to 5,000 pieces typically. CNC remains cheaper for low-volume production.
Cost Reduction Strategies
Design simplification reduces machining time substantially. Eliminate tight tolerances where not functionally required. Increase corner radii to speed cutting operations. Use standard hole sizes matching available tooling.
Batch similar parts together to reduce setup frequency. Order material in bulk to reduce waste. Choose easier-to-machine glass types when possible. Accept standard finishes rather than optical polish.
Summary
Glass CNC machining provides precision that traditional methods cannot achieve. The technology handles complex shapes with consistent accuracy. You get tight tolerances, smooth finishes, and less waste. Industries from automotive to electronics rely on this process.
Multiple techniques shape glass components effectively. Grinding, drilling, milling, and edge profiling each serve specific purposes. Specialised equipment and diamond tooling are essential. Skilled operators ensure quality results throughout production.
Material selection impacts machining success significantly. Soda-lime glass machines easily, whilst borosilicate requires careful parameters. Each glass type has unique properties. Choose based on your thermal and mechanical requirements.
Limitations exist despite advanced CNC capabilities. Material brittleness restricts the minimum thickness to 3mm, typically. Sharp corners cannot be machined. Slower production speeds affect costs and timelines.
Glass machining costs more than metal machining. Equipment, tooling, and labour expenses are higher. Scrap rates of 10-20% add to costs. The precision justifies the investment for demanding applications.
Glass machining success requires understanding material properties and process limitations. Partner with experienced manufacturers for optimal results.
Premium Parts specialises in precision CNC machining with 15+ years of expertise. Our Dongguan facility delivers accurate parts with guaranteed on-time delivery. We serve the automotive, aerospace, medical, and electronics industries worldwide.
Contact us for your glass machining needs. Our team provides DFM analysis and competitive quotes.